
Banoffee Pie Recipe
Banoffee is made from banana and toffee hence the name Banoffee Pie :-). You can make this recipe with easily available ingredients and i have a feeling everyone is craving for something sweet these days. A bit of sweetness is what we all need during this strange time of Covid epidemic.
Everyone is in quarantine, it has been over a month we have been at home, stepped out only twice to buy veggies etc. This is a strange time for everyone, never ever we thought that there would be a day like this when the entire world will be indoors. So now that I am at home with limited grocery supplies I try to make something exciting with what I have got. I went to my grocery cabinet again to find the stuff that have been lying there for months, even checked my fridge to make sure I use up every little item that has been just sitting inside the store and the fridge.
A pack of condensed milk has been sitting on the shelf for months, Also I saw I had a pack of cream (well within the expiry date, thank god!), Also I had a packet of biscuits that I bought in Rome in December. The biscuits are not that great so I had just left them in a corner in the store. I took all these long forgotten items out and decided to make a Banoffee Pie. I mean under usual circumstances I wouldn’t have dared because I try not to eat a lot of cream or sugar but now that I am at home, doing a lot of home chores, burning a lot of calories i decided to give my body some sugar lovin’..hehe!
The recipe is fairly simple, you just have to assemble a few things, no real cooking is required.
What Ingredients Do You Need to Make Banoffee Pie Recipe:
- Any glutenfree biscuits ( take biscuits that are sweet): a packet. 10-12
- Butter Melted: 1/4 cup
- Condensed milk: 1 can
- Cream/ whipping cream: 1 pack
- Instant coffee powder to sprinkle on top: 1 tablespoon
- Banana: 1
- Icing sugar: 2 tbsp
Method:
Make The Base:
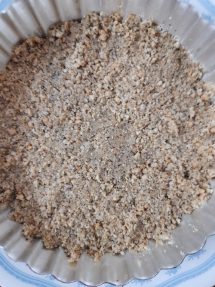
- In a food processor blend the biscuits till they all break down and become powder.
- Now take the powder out and mix the melted butter.
- Take this mix and line the base of the pie tin. Spread the mix all over the base of the pie tin, using any flat bottom of a glass, press on the mix so that they spread out evenly (pic below).
- Keep this in the fridge to set.
Make The Toffee:
- Take the condensed milk tin and let this boil for 2 hours on low- medium heat. OR If you have a pressure cooker, take the tin, immerse it completely in water and put the lid with the pressure on.

- On medium heat, let the pressure cooker make one whistle, the moment it has made the first whistle, lower the heat and let the cooker stay on the stove for 20 minutes. Take it off the stove after that. Let the can cool down completely before you open it. IT IS VERY IMPORTANT THAT YOU LET THE CAN COOL DOWN COMPLETELY.
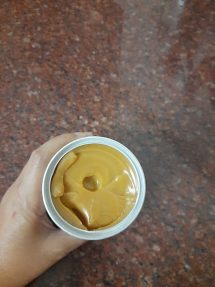
- After you hours when you open the tin you would see the condensed milk is now toffee. It is thick and has turned brown in colour.

Make the whipping cream with normal cream: (follow these steps if you don’t have an access to whipping cream)
- You need: 2 big bowls. One bigger than the other. The bowl should be big enough to allow whisking.
- Leave the bowls and the whisk in the freezer to chill (more than 4 hours). Leave the cream in the fridge. The reason we are keeping the cream in fridge is because we want to take out the thick cream and not the liquid, by keeping it in the fridge for a few hours (more than 4 hours) the cream will be easy to separate from the liquid.
- Time to make the whipping cream: Take out the chilled bowls and the whisk and the cream.
- In one bowl (the bigger one) place some ice cubes. Now take the other bowl put in the big bowl that has the ice cubes. Now that your bowl is super cold and is sitting on a bed of cubes it will remain chilled for a few minutes. Now take out the cream from the box (take out not pour. You might also end up pouring the liquid in the bowl so it is better to take the cream out with a spoon).
- Time to whisk. Use an electric whisk to whisk the cream. After 3-4 minutes the cream would have doubled in volume. Now is the time to add icing sugar.
- Whisk again for a few minutes until you see the cream make soft peaks (if you see the volume increase a bit more , the cream is ready to be used).
Layer The Cake:
- Take out the cookie base that you made from the refrigerator.
- Now apply the toffee layer on it evenly.
- Cut the banana slices and put one layer of it.

- Now put a layer of cream that you whipped.
- Sprinkle generously with coffee powder. (This is optional, I do it because I find the toffee to be too sweet and the bitter coffee powder just gives a good balance to that extra sweetness.)
- Now leave for an hour or two in the fridge to chill.

Glutenfree Banoffee Pie
Course: Sweet Tooth, Dessert3
servings6
hours40
minutes6
hours40
minutesIngredients
Any gluten-free biscuits ( take biscuits that are sweet): a packet. 10-12
Butter Melted: 1/4 cup
Condensed milk: 1 can
Cream/ whipping cream: 1 pack
Instant coffee powder to sprinkle on top: 1 tablespoon
Banana: 1
Icing sugar: 2 tbsp
Directions
Make The Base:- In a food processor blend the biscuits till they all break down and become powder.
- Now take the powder out and mix the melted butter.
- Take this mix and line the base of the pie tin. Spread the mix all over the base of the pie tin, using any flat bottom of a glass, press on the mix so that they spread out evenly (pic below).
- Keep this in the fridge to set.
- Make The Toffee:
- Take the condensed milk tin and let this boil for 2 hours on low- medium heat. OR If you have a pressure cooker, take the tin, immerse it completely in water and put the lid with the pressure on.
- On medium heat, let the pressure cooker make one whistle, the moment it has made the first whistle, lower the heat and let the cooker stay on the stove for 20 minutes. Take it off the stove after that. Let the can cool down completely before you open it. IT IS VERY IMPORTANT THAT YOU LET THE CAN COOL DOWN COMPLETELY.
- After you hours when you open the tin you would see the condensed milk is now toffee. It is thick and has turned brown in color.
Make the whipping cream with normal cream: (follow these steps if you don’t have access to whipping cream)- You need 2 big bowls. One is bigger than the other. The bowl should be big enough to allow whisking.
- Leave the bowls and then whisk in the freezer to chill (more than 4 hours). Leave the cream in the fridge. The reason we are keeping the cream in the fridge is that we want to take out the thick cream and not the liquid, by keeping it in the fridge for a few hours (more than 4 hours) the cream will be easy to separate from the liquid.
- Time to make the whipping cream: Take out the chilled bowls and the whisk and the cream.
- In one bowl (the bigger one) place some ice cubes. Now take the other bowl put in the big bowl that has the ice cubes. Now that your bowl is super cold and is sitting on a bed of cubes it will remain chilled for a few minutes. Now take out the cream from the box (take out not pour. You might also end up pouring the liquid in the bowl so it is better to take the cream out with a spoon).
- Time to whisk. Use an electric whisk to whisk the cream. After 3-4 minutes the cream would have doubled in volume. Now is the time to add icing sugar.
- Whisk again for a few minutes until you see the cream make soft peaks (if you see the volume increase a bit more, the cream is ready to be used).
- Layer The Cake:
- Take out the cookie base that you made from the refrigerator.
- Now apply the toffee layer on it evenly.
- Cut the banana slices and put one layer of it.
- Now put a layer of cream that you whipped.
- Sprinkle generously with coffee powder. (This is optional, I do it because I find the toffee to be too sweet and the bitter coffee powder just gives a good balance to that extra sweetness.)
- Now leave for an hour or two in the fridge to chill.


This Post Has One Comment
i am going to try this.